
So this might be a bit technical. If you’re just in it for the pretty, check out this image of the finished product: My new office chandelier!


Those are flowers Dale gave me for my birthday that I LOVED. And the print was a Christmas present from etsy! Dale added the hooks for me and I use them for my laptop bags and other stuff.
How we got it to work with the light switch was a bit of a challenge.
How to Rewire a Room
 We had wire where the ceiling fan used to be. So, for those who would like to know how to rewire a room, instruction are as follows:

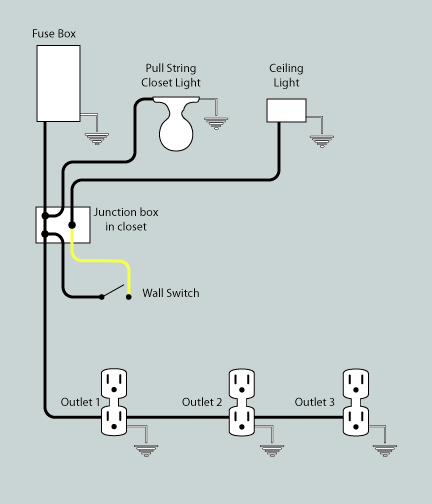
Above is a simple explanation of what we started with. Our house did not come with lights connected to a light switch when it comes to the bedrooms so we will have to do this in each of the bedrooms as we remodel.
Here’s Dale’s explanation of the illustration:
The inverted triangle represents “ground” in an electrical circuit. In reality ground is a white wire that runs back to the fuse box, completing the circuit. For visual simplicity it is represented as an inverted triangle.
The hot (black) wire runs from the fuse box to a junction in the closet, from there it’s split four ways:
- Closet light
- Ceiling fan (soon to be chandelier!)
- Light switch (which sends power via an orange wire to 1/2 of outlet 1
- second half of of Outlet 1, then outlets 2 & 3
This all worked fine if we wanted a ceiling fan operating from a pull string and a lamp plugged into a wall outlet. We didn’t want that. We wanted to have a chandelier controlled by the wall switch.
This illustration shows you what we did:
- The wire feeding the fan was disconnected from the “hot” wire at the junction box.
- The orange wire between the switch and 1/2 of outlet 1 was disconnected at both ends and capped.
- A new wire (yellow) was fed from the junction box to the switch.
- The yellow wire connects to the switch and is tied to the wire feeding the ceiling light.
- Outlet 1 has been replaced and now functions like outlets 2 & 3.
Here’s a quick rundown of how we did it:
WE TURNED THE ELECTRICITY OFF. Just to make that clear! And we hooked up the new wires in exactly the same places and in the same ways as the old wires. We were not reinventing anything.
Tools Used:
- cable snake
- wire pulling lubricant
- yellow electrical wire
- chandelier from Ikea

We pulled the closet light down to access the wires since it serves as the junction box for the room. We then pulled the wires out at the switch itself:  We tried a couple of methods for feeding the wire but ended up using a cable snake to pull the new wiring.

The cable snake worked well and we also used lubricant for the wire (it really helped).

We pushed the cable snake into the switch box end and it came out in the closet, at the junction box. We hooked the new yellow wire onto the cable snake and pulled it through the ceiling to the light switch:
 And there it is! We felt quite triumphant when it came through. Ha! You can also see in this photo that the orange wire was still attached to the light switch.

Next we had to open up outlet 1.

And the orange wire was also attached to outlet 1.

We capped the orange wire. We could have pulled it out entirely but we figured if, for whatever reason, we wanted to reconfigure in the future we might as well make it easier on ourselves. 
We capped the orange wire at the light switch and tucked it in the wall. Then we screwed the yellow wire where the orange wire had been. And we also attached the yellow wire to the appropriate spot in the junction box. Voila! 
Then Dale followed the directions for installing the little chandelier as you would any light fixture.

And carefully disentangled the cardboard and plastic once it was reasonably in place. 
And that’s how adorable it looks! Can you stand it? Because I can’t! I LOVE IT.
December 18, 2015 at 9:51 pm
The white wire is properly called the “neutral.” The black is “hot.”
The ground wire, often not present in older houses, is green inside of conduit (or bare if it is inside modern cable – Romex). This wire goes to the ground screw (green) in modern outlets and fixtures.
December 28, 2015 at 4:11 pm
Thank you very much for the correction.